A passion for silversmithing

STERLING SILVER : Noun, meaning silver of 92 and a quarter percent purity.....

Friday 16 December 2011

Hammered hearts

A friend commissioned some heart shaped earrings for her sons girlfriend. The design was completely up to me....this is how they turned out....


 and I followed them up with a ring and pendant using the same hammered heart design. So pretty. Must do more of this..the pendant sold at one of the craft stalls I did recently.
I have been busy with orders I took from the craft stalls, and also making jewellery for my nieces and friends for Christmas.

I have so many new things I want to try....just need a bit of time off from the day job !!

A gold "L"

My friend Linda (wife of Jimbo) had some gold left over from a solid gold bangle that she had had made for her in the past.

Two pieces about 2cm by 1cm, and she asked if I could make her an "L" to hang from a gold chain. The bits of gold were really dull, in fact they could have passed for old brass - I wish I had taken a photo before I started...

I had a plan for the "L" which in the end didn't go to plan, so went with my backup plan and was very happy with how it turned out.
 
First step was to solder the two pieces together and then saw off the edges to get the overall shape. My original plan was to make some coils with wire which I would use to pattern the gold in the rolling mill. You can just see the coils of gold in the photo...

Unfortunately I used the wrong wire to make the coils - it was copper, and too soft, and flattened in the mill leaving a soft smudgy pattern. Backup plan was to hammer the "L". First I had to sand off most the pattern, then I drilled a hole with my cougar hand drill. For the jump ring, I cut the earwire off a scrap gold earring and wrapped it round my pliers. After much hammering sanding and polishing, the finished piece is lovely and shiny, with a nice weight to it.
I think she will like it.

Saturday 19 November 2011

Jimbos bracelet

A friend commissioned a bracelet for her husband Jim. She left it completely up to me - bit scary that - what if I can't think of a design - or even worse what if I do and he/she doesn't like it!

I decide on a simple hammered, not too shiny bangle with wire decoration. For the bangle I buy 6mm x 1.2mm rectangle wire. It is the first time I have soldered silver this thick and its a nightmare!. With my solder torch I cannot get the silver hot enough to melt the solder before it oxidises. Once it is oxidised, no way will it solder. I reckon it took me 5 attempts, and each time I had to pickle it and then flux and try again. I tried first with easy strip solder, then extra easy, eventually I used easy solder paste and finally it went. Not that it went well....the solder didn't flash, just sort of ran, but it seems solid enough - phew!

Next I softened the sharp edges with sandpaper, then hammered it using my disc cutter to lay it round.
 So far so good. I don't have a bangle mandrel so hunted round for something the right diameter to shape it. I ended up using a tin of baked beans - perfect size, and I used my rawhide mallet to knock it round.

I didn't want to leave it just plain, so I wire wrapped it three places, flattening the ends and tucking them under the wire at the back.


Next I polish it with tripoli only as don't want it too shiny.

 Finally I oxidise it and then polish it again. I love it, it's really rustic and heavy and the oxidisation shows up the hammered surface beautifully.


 Hope he likes it!

Saturday 12 November 2011

Silver Workshop tips

Some ideas for the workshop...

A cheap plate rack from The Range, holds all my pliers and hammers and saw.
 My solder torch hangs from a curtain tie back hook on the side of my bench...
 I hang my silver wire with paper clips from the metal sheet I have behind my solder area. I have written the sizes on the sheet so I can easily grab the right one.
 My daughter bought me the mini filing cabinet and I keep my punches, liver of sulpher, saw blades, solder paste and loads of other things in here. I have had to label the drawers though.....couldn't ever remember what was in where!
I have my old ipod in a docking station, photos of my lovely Nana, and other keepsake trinkets around me while I work. Its only a small room but it does just fine.

Monday 7 November 2011

The cigarette case earrings

I have finished the earrings for my sisters, made from my Grandads silver cigarette case. I have kept the fine pattern from the silver on the beads, and I love they way they look old, just like the original item.


and a simple pendant to match.
  

I'm almost glad to see Autumn. When the sun is shining I need to be outside, but the colder weather and grey days means I can spend more time in my workshop. Mind you the leaves still need to be 'hoovered'....

Monday 24 October 2011

Vintage sterling silver cigarette case

I have been making some new bits of jewellery out of my Grandads old cigarette case

No matter how hard I tried I could not manage to solder a jump ring to this pendant I was trying to make. I think the problem was partly that the glass cabochon and the insulated tweezers were preventing the silver from getting hot enough for the solder to melt. In the end I forgot to let it cool after one attempt, and dropped in the water to quench and the glass cracked.

I have succesfully made a lovely antique looking ring (por moi) and 2 pairs of earrings for my sisters to go with the pendants I have started but not yet finished. For the ring and earrings I started by cutting some discs with my disc cutter....with the pattern of the cigarette case downwards so that I did not damage it.


I then domed them with my dapping punches, again with the pattern downwards, in ever decreasing sizes of 'dome holes' to make them as round as possible..


My plan for the ring was to use the domed silver as a cabochon and set it into a bezel setting, with the pattern as a feature. I had to cut the 3mm bezel strip in half length wise to save too much sanding after. The base of the bezel was another disc, which I soldered to the bezel strip with the pattern downwards.

The shank was made from 1.2mm round wire which I very lightly flattened with the rolling mill, and the ends I hammered the opposite way where they will join the bezel. For once soldering all went great first time, then after some sanding and polishing I set the domed disc inside - always the best bit. I love it, it looks old, and very unique.


For the earrings, I soldered two of the discs together to make a bead, first filing a small dent each edge so there would be a hole to feed wire through. I sanded the cut edge first to get a flatter fit, and I applied solder paste to the inside of the edge of one, then held them together with hands free tweezers to solder them. It is easier than it sounds, the silver gets hot quite quickly and the solder flows to fill the join, though I did rotate the tweezers to get even heat all the way round. Very satisfying!!

Sunday 9 October 2011

Thank goodness for the rug!

When I turned the spare room into my workshop, I put a cheap rug on the floor to cover our nice cream carpet. Thank goodness I did! I was busy making balls of silver and gold with offcuts, and I dropped a silver ball on its way to the quenching  bowl...it melted straight through the rug and I desperately tried to pick it up with my tweezers dropping it a further 6 times before managing to pick it up. I now have 7 small melted holes in my rug, but thankfully the carpet was saved!!

I have been trying lots of new techniques this weekend, not all successful.  In my earlier post I showed you my grandfathers solid silver cigarette case. The pendants for my sisters are almost finished, but I wanted to try something a bit different with some of the remaining pieces of silver. I had some glass cabochons, and they look fantastic when placed over some of the pattern on the silver, or even better when placed over the engraved bits as you can see here (Grandads name was Surtees Scott).


I punched some discs in the case using my disc cutter, one for the base that the cabochon would sit on, and one to hold the cabochon in place. The second disc I punched again with a smaller punch to leave a sort of collar for the bead, which I domed with my punches in the doming block.So far so good.


I had to sand and file the collar a lot to make it fit down over the cabochon so that it touched the flat base all the way round for soldering. I managed to solder it to the base with the glass in place - not the best job but a bit of sanding would improve it. 
I then tried to solder a simple loop to the top so that it could hang froa chain, and no matter what I did I could not solder the loop to the main piece. Tried 4 or 5 times, pickling in between, but the silver did not seem to get hot enough for the solder to melt. I had the piece held in the tweezers and I did wonder if the tweezers were absorbing the heat. In the end I stupidly forget to let the glass cool before quenching and it cracked into pieces. That was a few wasted hours in all. So frustrating when the solder won't flow!!

Might have another go when I have spare time. 

Meanwhile I made a few new pieces in-between times. My daugther was given a pretty christening bracelet when she was a baby, and I have never seen anything like it since. I made something similar from 2mm wire, with a sterling silver bead dangling from it. Oxidised as always to age it a little, and I quite like the result. It is tiny, which doesn't really show in the photo. All soldered, so safe for a little baby.


I made a lovely tiny wreath of silver, and hung it from some gorgeous loose chain that I bought online. The clasp is also hand forged. Its really rustic, and very organic looking.

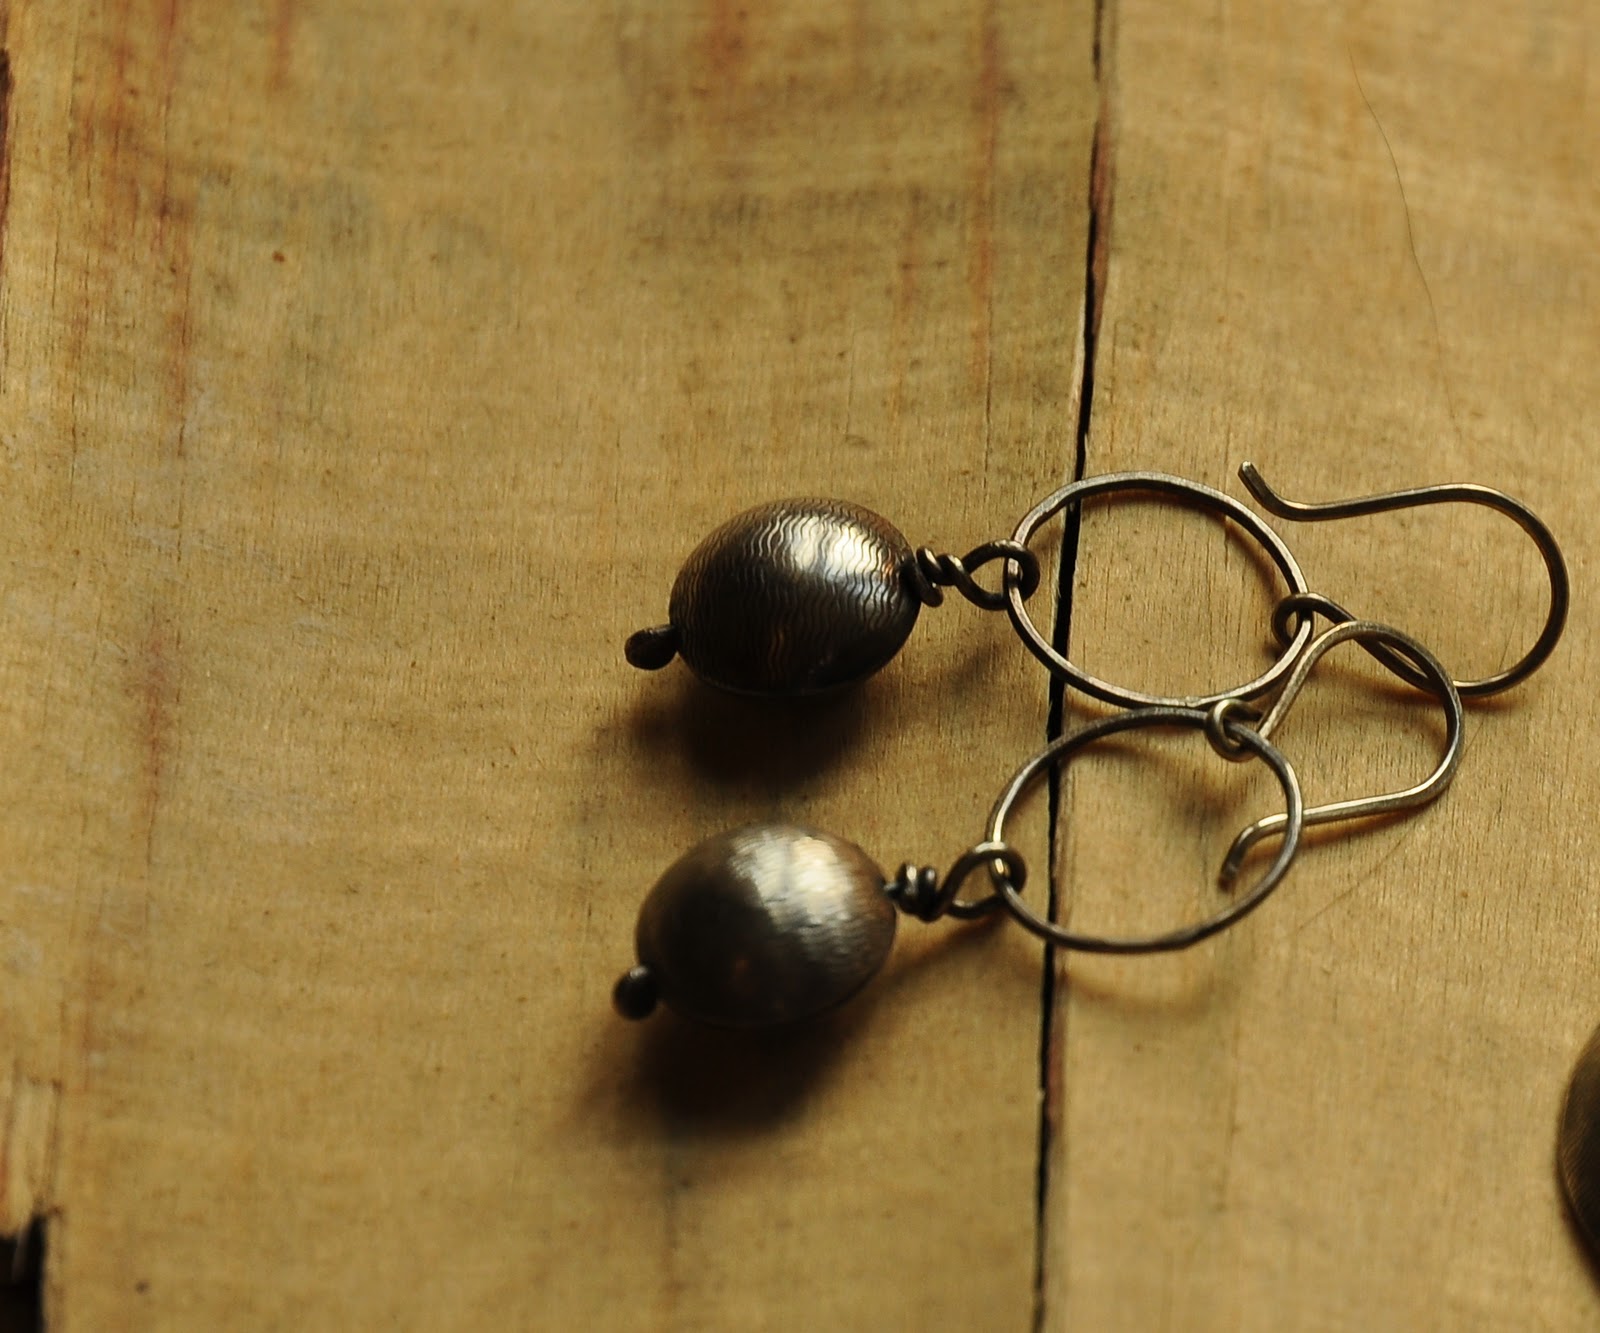
Next up was some earrings, hammered circles with semi-precious beads of jade and turquoise, dangling from hand forged earwires. 


I have a craft stall in November so need to plan for that. Craft sales I have done in the past, I have made all the stock beforehand and the aim was to sell as much as possbible on the day. I can't do that with silver because it is too expensive so I need to make a smallish set of pieces and take orders on the day. I need to decide how best to display the pieces of jewellery to make the most of them, preferably using wood and greenery as I have done in the photos in my etsy shop.

Sunday 2 October 2011

A brilliant bead shop in Bosham

I visited Beadazzle in Bosham last weekend. What an amazing shop! Its small, but lined from top to bottom with jars of gorgeous beads, all sorted by colour. Good prices and lots of choice.

I bought a small bag full of semi precious and glass beads which I thought would work well with silver. 

I made an oxidised silver bangle with an amazonite bead. Very pleased it with it, the bead hangs beautifully.


I also made a couple of pendants with a large turquoise bead and a lovely yellow foil glass bead. 


For both of these I hung them on some new chain I bought loose from the Silver Corporation.  It has 7mm oval links and looks good oxidised.

All these are for sale in my etsy shop www.etsy.com/shop/tripoliandrouge

Lots more beads to play with yet.........

Saturday 24 September 2011

My two sisters

I have this old solid silver cigarette case that my Grandad was given when he retired from the Gas Co. in 1933. It's a bit battered, but lovely, and solid, and it's engraved. It has been in my loft for years. I wouldn't sell it, it's too personal, but what is the point of it sitting in my loft?


I take the plunge and saw it into 8 pieces, and start to make some jewellery for my two sisters for a Christmas present.


I punch some discs and saw a larger circle to make beads and pendant and some earrings. The outside of the case has a lovely delicate pattern on it which I want to retain in the jewellery.


 I dome the pieces with wooden punches so I don't damage the patter, then I drill small holes.

 I make two beads by soldering two discs together. I have to hold the two discs in my helping hand tweezers to keep them together and I use solder paste for this job, putting on the inside of one of the discs.

Before pickling....


 ...after pickling

I have run out of silver wire, all shapes and sizes, so can do no more today.

Here is me and my sisters at my nephews wedding earlier this year....I am on the right, younger sister Sally in the middle, and older sister Sue on the left. This was the first wedding of our collective children (8 in all) and it was such a brilliant day.